
A 6-Step Guide To Golf Club Regripping
Golf club regripping is more than just routine maintenance; it’s a key strategy to improve your game. Worn grips often lead to slippage, tension, and inconsistency in your swing. Fresh grips, on the other hand, bring back control, comfort, and confidence.
If you’re curious about how to regrip your golf clubs at home without visiting a pro shop, we’re here to guide you. This step-by-step walkthrough uses tools and techniques trusted by experienced players and repair professionals.
At Brampton Technology, we have decades of golf club building and regripping experience. Taking input from all levels of golfers and clubmakers, we understand the in’s and out’s of club building. Whether you’re regripping your clubs for the first time or refining your technique, this guide offers practical, detailed instructions that are easy to follow.
Why Regrip Your Clubs?
Grips naturally wear down over time from sweat, oils, dirt, and exposure to sunlight. A worn grip can subtly alter your hand positioning and cause tension during your swing.
These changes impact everything from ball flight to the feel of the club at impact. Many golfers don’t realize how much a fresh grip can improve their performance until they make the change.
For those who play regularly, replacing grips at least once every season is a smart move. Regripping is one of the simplest and most affordable ways to keep your game consistent.
Choosing the Right Golf Grip
Before you start the regripping process, choose a grip that matches your playing style and personal preferences.
Grips come in a variety of textures, firmness levels, and sizes, including standard, midsize, and jumbo. The size you select depends on your hand size and swing mechanics. A grip that is too small can encourage overactive hands, while one that is too large may limit natural movement.
Our team at Brampton Technology recommends trying out several grips before making a final choice. If you’re uncertain, midsize grips usually provide a balanced option. You can also consult a club fitter or check sizing charts from grip manufacturers.
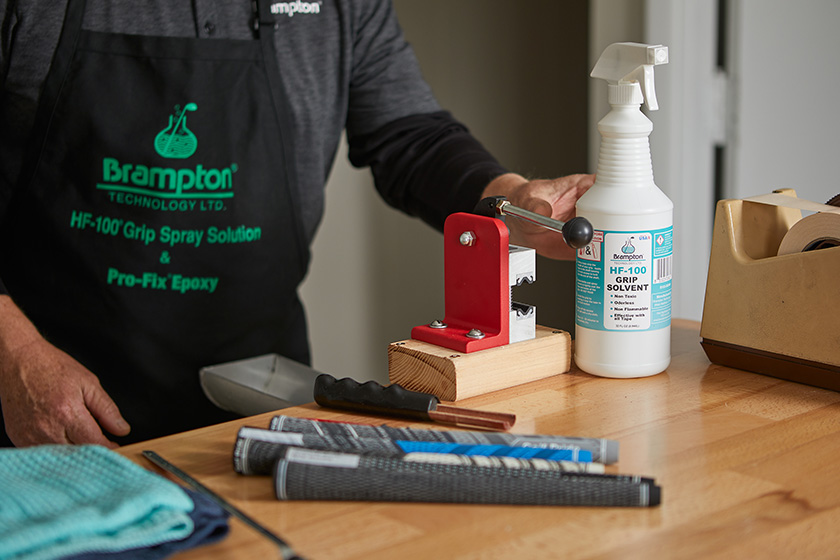
Tools and Supplies You’ll Need
To regrip a club successfully, gather the right materials in advance. You’ll need:
- A vise with a shaft clamp
- A hook blade or utility knife
- Double-sided grip tape
- Golf grip solvent
- A drip tray or catch basin
- New grips
- A towel and rubber gloves
Golf Club Regripping: Seven Steps
Secure the Club
Place the club in a vise using the shaft clamp. Make sure it is firmly held without overtightening, which could damage the shaft. Position the club so the grip area is easily accessible and comfortable to work on.
Remove the Old Grip
Use a hook blade or utility knife to carefully cut through the old grip lengthwise. Take your time to avoid damaging graphite shafts. Once the grip is split, peel it off the shaft. If you’re working with graphite shafts, be extra cautious as they are easily damaged. Always cut away from your body and toward the end of the grip to stay safe.
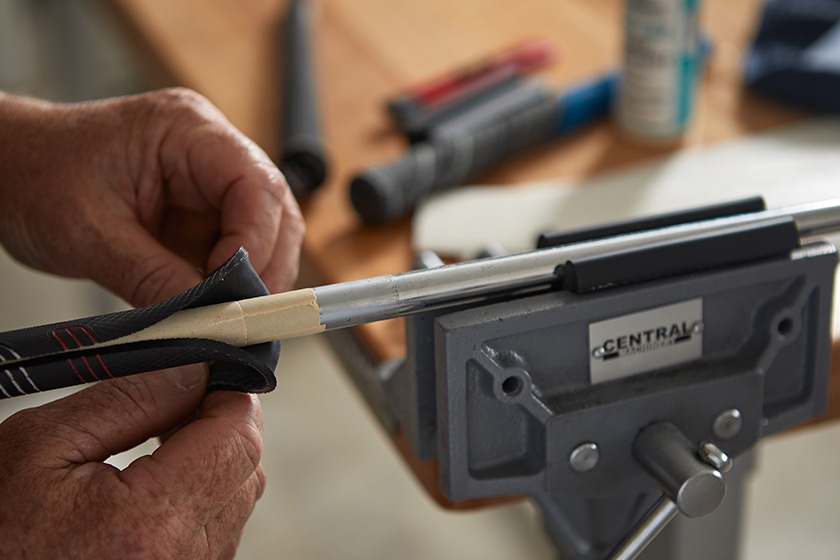
Remove Old Tape Residue
Peel off the old double-sided tape. Depending on how long it has been on, this can require some effort. Using solvent or a mild adhesive remover can help loosen stubborn spots. Using a Brampton Uneekscraper makes this process a lot easier.
Afterward, wipe the shaft with denatured alcohol and a fresh towel to make sure it is clean and dry. Removing all residue is critical so the new tape sticks properly. Any leftover solvent can prevent the grip tape from sticking to the shaft.
Apply New Grip Tape
Wrap double-sided tape around the shaft where the new grip will sit. Most golfers apply one full-length wrap with some overlap at the butt end.
You can add extra layers if you want a thicker grip If the liner is still on the tape, remove it to expose the sticky surface. Make sure the tape lays flat and smooth for best results.
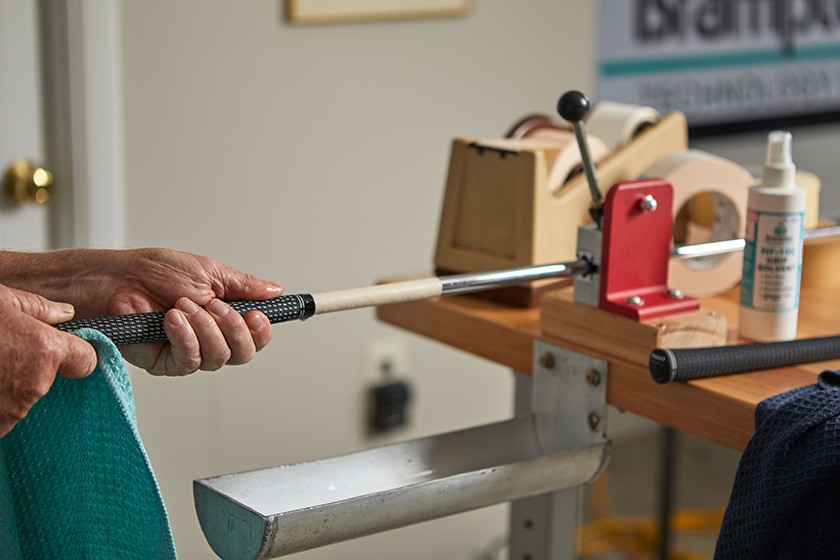
Apply Solvent
Spray a generous amount of grip solvent on the grip tape and into the new grip. Cover the hole at the end and shake the grip to coat the interior evenly. Then pour the remaining solvent over the taped shaft area, guaranteeing full coverage. This acts as a lubricant to help the grip slide on with minimal resistance.
Slide on the New Grip
With the grip tape still wet from the solvent, quickly slide the new grip onto the shaft. Align any logos or grip patterns as desired. Work swiftly but carefully, because once the solvent begins to evaporate, adjusting the grip becomes difficult.
When the grip is in place, make any final alignment adjustments while it is still movable. Rest the club upright to dry for around 15 minutes. Drying times can vary depending on the amount of solvent used.
How Often Should You Regrip?
There’s no universal timeline, but regripping once a season is a good rule for regular players. If you play multiple times a week, more frequent replacements may be necessary. If you play in humid or hot conditions, sweat and moisture can wear grips down even faster.
Keep an eye out for signs like shiny spots, fading texture, or hardening rubber. These are visual clues that it’s time to replace the grip before performance suffers.
Regripping Tips from Our Team
Over the years, we’ve worked with hobbyists and professionals who trust us with their golf repair needs. Here’s what we’ve found helpful:
- Always work in a well-ventilated space, especially when using solvents.
- Don’t rush the drying process — let the solvent fully evaporate.
- Use a drip tray to catch excess solvent and avoid spills.
- Wear gloves for a cleaner experience and better grip when sliding on the new one.
And most importantly, practice patience. The more clubs you regrip, the better your technique becomes.
Why DIY Regripping is Worth It
Regripping your own clubs saves money, especially if you play regularly. It also lets you experiment with different grip sizes and materials without having to commit through a club fitter. Furthermore, there’s a real satisfaction in playing with gear you’ve worked on yourself.
Brampton Technology has designed our epoxy and grip solvent lines to support both first-time regrippers and experienced builders. Our products are Made in the USA, affordable, and built with performance in mind. We’re proud to be a family-owned company that puts quality and service first.
About Brampton Technology
We specialize in high-performance golf products, from industry-trusted epoxy to golf grip solvent that makes regripping easy and efficient.
Our goal is to help golfers and repair technicians build, maintain, and enjoy their clubs with confidence. With a reputation for quality and a commitment to affordability, we’ve earned the trust of players and pros across the country.
Visit Brampton Technology to explore our full range of golf repair solutions.