PRO-FIX® Long Cure Epoxy
20-minute work life allowing time for 14 club full set to be bonded per mix. Full cure in 24 hours at 72°F/22°C.
Mixing Ratios
- Volume Ratio 1:1
- Weight Ratio Part A 114g : Part B 100g
Description
PRO-FIX® Long Cure Epoxy
Properties
20 minute work life allowing time for 14 club full set to be bonded per mix. Full cure in 24 hours at 72°F/22°C. Works with all club materials (steel, titanium, graphite, wood and plastics)
Mixing Ratios
This product is available in multiple container types to meet your dispensing needs: cartridge, syringe, and 2 bottle sets.
- Volume Ratio 1:1
- Weight Ratio Part A 114g : Part B 100g
Engineered for Golf
PRO-FIX® Long Cure was the first epoxy Brampton formulated and was engineered for assembly and production shops. PRO-FIX® Long Cure has the longest work life of all the Brampton epoxies. This formulation was developed with impact resistance and durability as its major components and has shown outstanding performance and versatility.
Sizes
0.85oz Syringe, 1.5oz Cartridge, 7oz Cartridge, 20oz Cartridge, 4oz Bottle Kit, 8oz Bottle Kit, 16oz Bottle Kit
California Proposition 65 Warning
This product contains chemicals known to the State of California to cause cancer and birth defects or other reproductive harm.

-
How long does it take for Long Cure Epoxy to cure?
At room temperature it will be fully cured in 24 hours. Hot temperatures will speed up curing and cold temperatures will slow down curing.
-
How should I test to see if the Long Cure Epoxy is fully cured?
After the recommended curing time you can test the epoxy by leaving a small amount on the mixing tray. If the epoxy on the mixing tray is hard the club is ready to be handled.
DO NOT test the bond by twisting the club to see if it has cured, this will only weaken the bond.
-
How long before I can handle the club?
It is recommended that the club is left to cure without moving it. If the club is moved during the curing process the bond strength can be reduced.
-
How long should you mix the Long Cure Epoxy?
First you should only dispense enough to bond amount of clubs being constructed do not exceed 14 clubs. Make sure you have prepared all the components before you start the mixing process. Mix thoroughly for 30 seconds. DO NOT remix or try to apply to additional clubs as the epoxy will have already started the curing process and although it may appear usable it will yield a weaker bond.
-
How much Long Cure Epoxy is needed per club?
Dispense 1 inch bead line of both part A and part B per club. When constructing an entire set we recommend three 4-inch bead lines.
-
Can I add Glass Shafting Beads to Long Cure Epoxy?
Yes. If you have a loose-fitting shaft, glass beads will help center the shaft into the club head for consistent bond. Note: Mix 2%-4% by volume of glass shafting beads with PRO-FIX Epoxy. DO NOT EXCEED 4% ratio. Add during the epoxy mixing process.
-
What is the color of cured Long Cure Epoxy?
Amber when fully cured.
-
Does Long Cure Epoxy work with all club materials?
Does Long Cure Epoxy work with all club materials?
-
How do I use a syringe or cartridge?
PRO-FIX epoxies come in both double barreled syringes and cartridges. The 0.85 oz syringe comes with a plugger and removable cap. The larger cartridges require an epoxy dispensing gun. Before opening, rest the cartridge tip up to allow trapped air to rise to the top. Gently press to expel air and ensure epoxy is dispensing evenly from both sides. When finished pull back to release pressure before capping.
-
What can I do if my Part A resin thickens?
Place your sealed bottle of Part A into a container of hot water for 15 minutes. This will return Part A to the original viscosity for proper performance.
-
What is the proper storage method for Long Cure Epoxy?
For all cartridges – recap and place in a resealable plastic bag. Store in a cool dark place.
For all bottled kits – squeeze out all air, recap, and place in a resealable plastic bag. Store in a cool dark place.
-
Possible reasons for bond failures?
Most bond failures are caused by not preparing all the components properly and not following mixing and curing instructions. Below are some of the common factors that can cause bond failures.
- When re-shafting a club make sure the neck of the club and hosel is properly cleaned. Any residue from the old epoxy will leave a surface that will be detrimental to the bond. Make sure all dust and any other containments are removed.
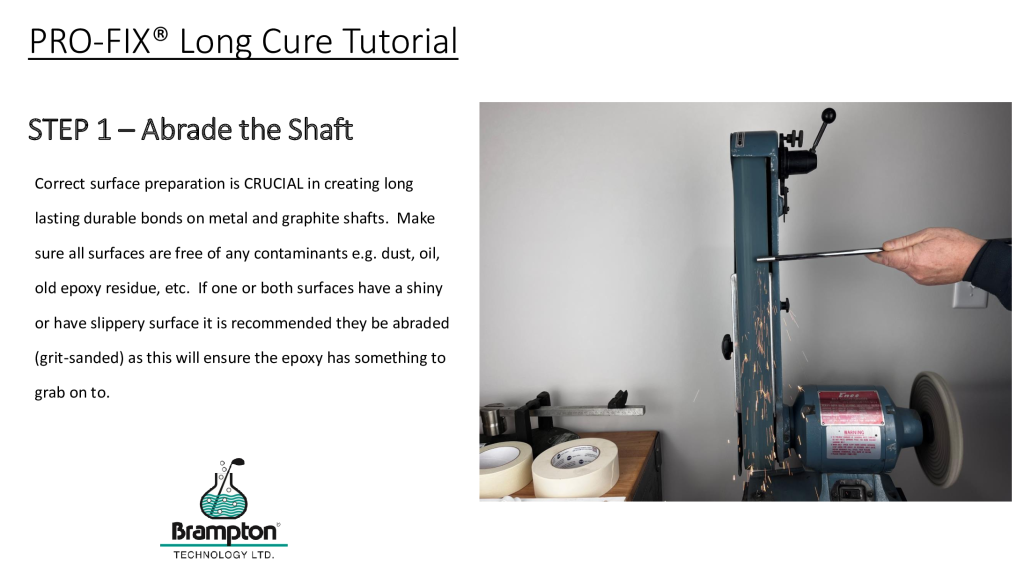
- Make sure the shaft is properly abraded so that chrome or the lacquer on graphite shafts is removed and has a rough texture for the epoxy to grab onto.
- Check the depth of the bore there should be at least 1” of shaft depth. Sometimes there may be residual epoxy that needs to be removed.
- Make sure you leave the club to dry and cure properly at room temperature (72 F /22 C).
DO NOT handle the club until the epoxy has fully set or the bond will be compromised.
- It is critical that equal amounts of Part A and Part B are dispensed. If too much Part A is dispensed it will create a weak rubbery bond and conversely too much Part B will create a brittle bond.
- Not using enough epoxy to thoroughly coat both the inside of the hosel (club head) and the shaft could cause a bond failure. Remember there is only a small gap (.005 ideally) between the shaft and hosel. Also, use a twisting motion when inserting the shaft into the head as this will ensure proper coverage and help create a durable strong bond.
- Too large of a gap between the hosel and shaft with decrease the structural and mechanical strength of the bond and this could lead to bond failure. A combination of glass shafting beads and shaft shims can be used to help bridge the gap.